Virtualization Tools Overwiew for Layman
作为想入门云服务、虚拟化的初学者,去搜索相关的信息、学习资料,就会看到各种各样的工具、概念,完全迷失方向。qemu,kvm,然后又出来一个qemu/kvm。好不容易弄明白之后,又蹦出来一个libvirt,和libvirt相关的又有virsh, virt-manager等等。下载一些镜像的时候又有cloud-init 。看一些云厂商AWS,Azure等文章突然又出现SasS, PaaS, IaaS。还有openstack要来凑热闹,openstack里面又有n个名词,比如Horizon,Nova,Cinder等等。这个时候,只有“What the fuck?”可以形容内心的心情。
所以这篇博客想要从high-level以及这些技术的演化路线的角度来总结一下主流的开源虚拟化概念/工具间的相关性,并且给出在一台服务器上通过libvirt/qemu/kvm配置一台虚拟机的具体过程来加深理解。
What is cloud service
云服务(Cloud Service)可以分为三种基础的模型–IaaS, PaaS, SaaS,Albert Barron在2014年时提出的Pizza-as-a-Service比喻很好的解释了这三种基础模型的区别,这里我们采用饺子的比喻。如果要在家做饺子,我们需要剁肉馅,擀饺子皮,包饺子,煮饺子,最后把饺子上上餐桌,这里面的每一个步骤都需要我们亲力亲为。在计算的场景下,也就是我们需要自己去买CPU、硬盘,搭建服务器,配置网络,搭建操作系统,配置系统环境,下载必要的应用,我们才可以真正使用服务器。
-
SaaS (Software as a Service):SaaS就相当于我们去餐厅吃了份饺子,有服务员会把饺子直接端到我们面前。也就是说,厂商直接把开发好的应用提供给我们了,我们直接就可以拿来用了。比如我们访问google docs就可以直接对文档进行多人同步编辑,数据也在云存着。
- PaaS (Platform as a Service):PaaS就相当于我们点了个饺子的外卖,我们需要做的事情只是上饺子。也就是说,厂商把一些软件开发的环境也配置好了,比如操作系统、中间件、运行时环境等等。也就说可以直接在这一层上根据自己的需求开发/测试自己的应用。
- IaaS (Infrastructure as a Service):IaaS就相当于我们去买了一袋速冻饺子,我们只需要去煮饺子、上饺子就好了。也就是说,有厂商给我们搭建好了一组服务器,我们只要向他们租一台服务器(虚拟机),直接就可以使用了,不需要再自己去买硬盘这些设备了。在这一层,最重要的技术就是虚拟化技术。

Virtualization Framework Generalized
有了上面的big picture后,我们现在更加关注IaaS层面,主要是从high-level的角度分析虚拟化相关的概念和开源工具。以下是这些工具/概念发展的时间线:

接下来我们按照这条时间线,逐一介绍每一个开源工具/概念。
Tools in details
1. QEMU
-
Quick EMUlator,简单来说就是一个进程。
-
由于不同架构的发展,如x86, arm等,就有了在一个架构上执行另外一个架构程序的需求,QEMU在最开始的时候采用纯软件的方式去模拟指令,即TCG,通过binary translator技术,把一个架构的指令转化成为另一个架构的指令,然后在CPU上执行。
-
QEMU还可以模拟很多硬件资源,比如磁盘、网络、USB等。
-
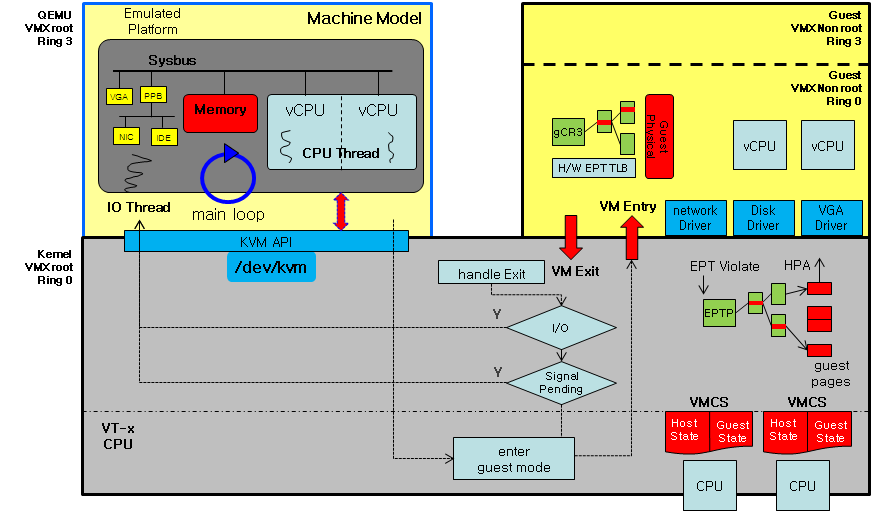
为了加速对CPU的模拟,QEMU可以通过调用KVM提供的接口,使用硬件虚拟化技术,不需要通过软件模拟直接在硬件上执行大多数指令,这也就是qemu/kvm,现在的qemu一般都会使用该方式加速。qemu/kvm的架构如下:
2. Xen
-
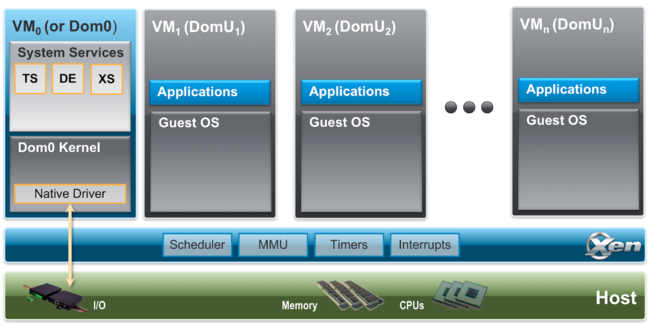
Xen使用了paravirtualization技术,即guest OS需要对虚拟化进行适配,以便与虚拟化层进行通信和协作。在Xen中把虚拟机(VM)称做Domain
-
整个Xen hypervisor 的架构如下:
3. VT-x & AMD-V
- 分别由由Intel和AMD在硬件上引入的虚拟化支持。
- CPU虚拟化上,Intel VT提供了VT-x技术
- 引⼊两种操作模式(为了解决敏感指令问题) ,统称为VMX操作模式,该模式与Ring0-Ring3的特权级 正交
- 根操作模式 (VMX Root Operation): VMM运⾏所处的模式
- ⾮根操作模式 (VMX Non-Root Operation): guest/VM运⾏所处的模式
- 引⼊VMCS (Virtual Machine Control Structure): 保存虚拟CPU需要的相关状态,如CPU在root/nonroot下的特权寄存器值,在CPU发⽣VM-Exit/VM-Entry是⾃动查询和更新VMCS
- 添加了⼀组新指令: 如VMLAUCH/VMRESUME发起VM-entry, VMREAD/VMWRITE⽤于配制VMCS
- 引⼊两种操作模式(为了解决敏感指令问题) ,统称为VMX操作模式,该模式与Ring0-Ring3的特权级 正交
4. KVM
-
Kernel-based Virtual Machine,简单来说就是一个支持硬件虚拟化的内核模块, 使用
lsmod | grep kvm可以查看相关内核模块 -
KVM利用VT-x, AMD-V等硬件虚拟化技术,把Linux内核直接转变为一个虚拟化层,来实现虚拟化。一般上会用,QEMU作为用户态的前端。
grep -E 'svm|vmx' /proc/cpuinfo # 查看是否支持硬件虚拟化 sudo apt install qemu-kvm # 下载kvm包 -
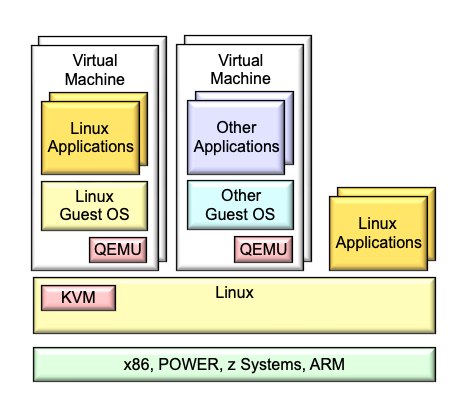
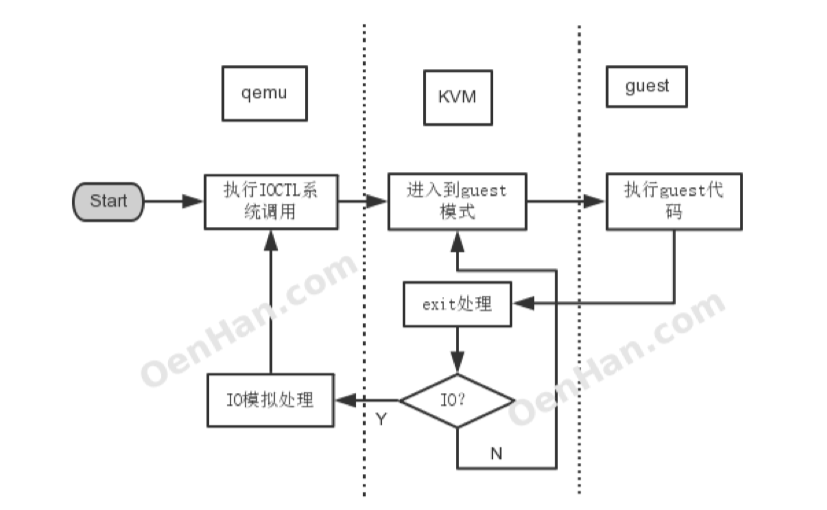
KVM的基本⼯作原理及架构如下图 (cited from OenHan & Adam Jollans):
-
由虚拟化管理软件Qemu开始启动⼀个虚拟机
-
通过ioctl等系统调⽤向内核中申请指定的资源,搭建好虚拟环境,启动虚拟机内的OS,执⾏ VMLAUCH 指 令,即进⼊了guest代码执⾏过程。
-
如果 Guest OS 在⾮根模式下敏感指令引起的 trap,暂停 Guest OS 的执⾏,退出QEMU,即guest VMexit,进⾏⼀些必要的处理,然后重新进⼊客户模式,执⾏guest代码;这个时候如果是io请求,则提交给⽤ 户态下的qemu处理,qemu模拟处理后再次通过IOCTL反馈给KVM驱动。
5. Libvirt
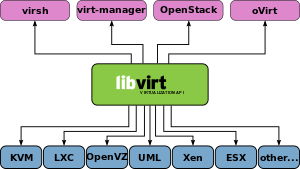
- 一个开源的虚拟化管理工具集,提供了一组API和工具,用于管理和控制不同虚拟化技术(如KVM、Xen、QEMU等)下的虚拟机。
- 由于有各种各样的虚拟化技术的出现,libvirt提供了一个统一的接口,使用户可以以统一的方式管理和操作各种虚拟化平台上的虚拟机
-
在Linux中,libvirt进程以守护进程的方式运行,被称为
libvirtd。它作为一个后台服务运行,并通过libvirt API提供虚拟化技术的管理基础设施。通过以下命令,安装并激活libvirtdsudo apt install libvirt-daemon-system systemctl start libvirtd systemctl enable libvirtd sudo usermod -aG libvirt <username> # allow regular users to manage virtual machines- libvirt要做的所有操作都是通过XML文件配置的
- libvirt可以解析相关XML配置,按照配置对应的命令行参数启动虚拟机,如QEMU。
-
客户端程序如virsh, virt-manager, virt-install以及云计算平台框架如OpenStack等可以通过调用libvirt提供的API配置和管理虚拟机。
-
Virsh
- The command line client interface of libvirt is the binary called
virsh.
- The command line client interface of libvirt is the binary called
-
Virt-manager
- 管理KVM, qemu/kvm, xen, lxc等虚拟化程序的图形化界面
- 可以通过VNC和SPICE客户端直接访问VM的图形化界面。
-
Virt-viewer
-
是virt-manager的一部分
-
UI for interacting with VMs via VNC/SPICE
-
-
Virt-install
-
是virt-manager的一部分
-
Helper tools for creating new VM guests
-
-
6. OpenStack
-
开源云操作系统,对于一台服务器我们可以通过虚拟化技术跑不同的操作系统。如果我们有很多台服务器,如何组合编排这些硬件资源,为用户提供虚拟机,就是云操作系统需要做的事情。
-
OpenStack is a cloud operating system that controls large pools of compute, storage, and networking resources throughout a datacenter, all managed and provisioned through APIs with common authentication mechanisms.
- Nova: a component in the openstack to manage computing resources.
- 在 Nova Compute 节点上运行的 nova-compute 服务调用 Hypervisor API 去管理运行在该 Hypervisor 的虚机。Nova 使用 libvirt 管理 QEMU/KVM 虚机,还使用别的 API 去管理别的虚机。
- Nova可以根据磁盘、网络的配置自动生成libvirt需要的XML文件,再根据该配置去调用libvirt的API
-
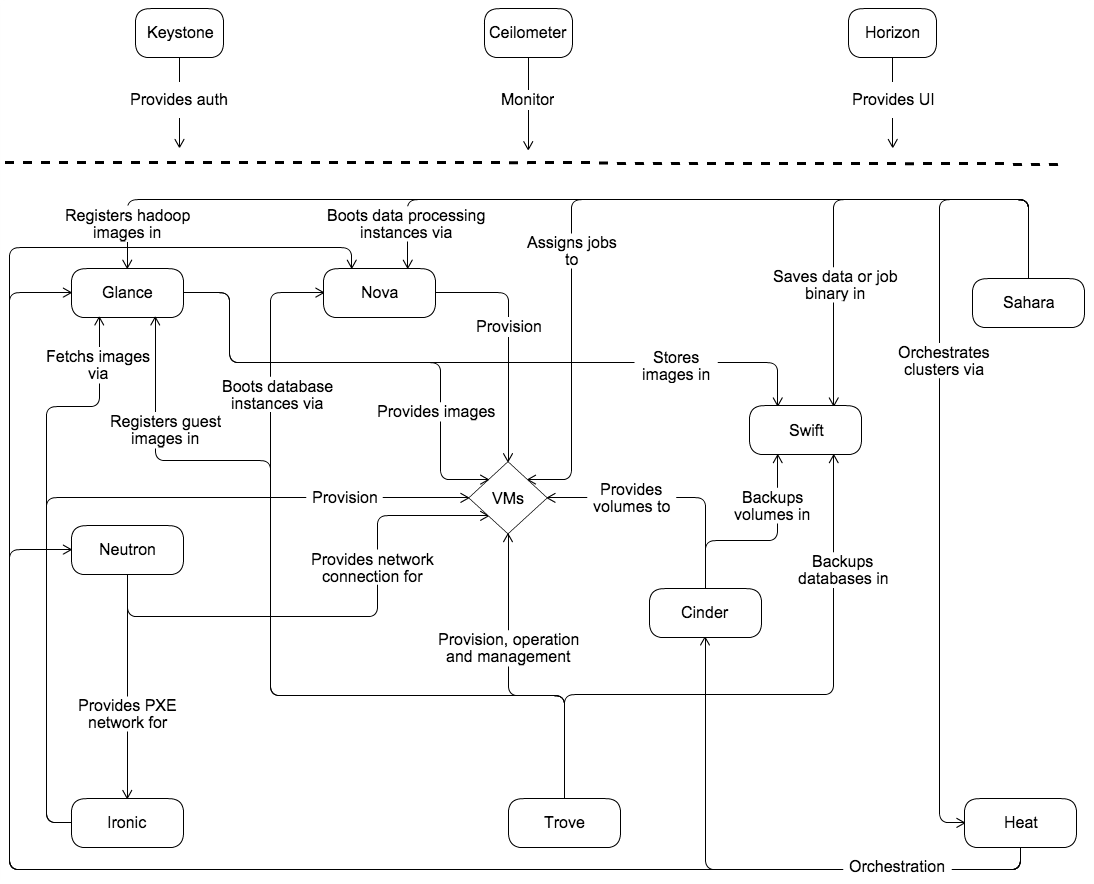
OpenStack conceptual architecture(看个乐吧
7. Cloud-init
-
cloud-initis a tool used in cloud computing environments to customize virtual machines at boot time- It allows for the automatic configuration of network settings, user accounts, and other system settings that are required for the virtual machine to function properly.
-
cloud-initworks by reading configuration data from a variety of sources, including user data, metadata, and vendor data.
- A cloud backing image is an image that has been created with
cloud-initsupport built-in. Many cloud providers offer a selection of pre-configured cloud backing images for common operating systems and applications, which can be easily launched from their cloud dashboard or API
Lab–使用libvirt/qemu/kvm创建运行虚拟机
-
查看CPU是否支持虚拟化
grep -E 'svm|vmx' /proc/cpuinfo -
下载必要的包
sudo apt install \ qemu-system-x86 \ libvirt-clients \ libvirt-daemon \ libvirt-daemon-system \ virtinst \ virt-manager \ bridge-utils -
添加当前用户权限:把当前用户添加到kvm, libvirt, libvirt-qemu groups
sudo adduser <username> kvm sudo adduser <username> libvirt sudo adduser <username> libvirt-qemu -
virsh命令行程序默认会使用qemu的qemu:///user接口,我们需要所有的客户端程序都和qemu:///system这个接口交互,以至于VM可以在root模式下运行。所以我们需要更改一些config:mkdir ~/.config/libvirt sudo cp -rv /etc/libvirt/libvirt.conf ~/.config/libvirt/ # 拷贝默认的config sudo chown <username>: ~/.config/libvirt/libvirt.conf #更改config的owner为当前用户编辑
~/.config/libvirt/libvirt.conf文件uri_default = "qemu:///system" -
对于存储文件权限,打开
/etc/libvirt/qemu.conf并将用户(假设当前用户名为foo)设置为当前并将group设置为 libvirt-qemuuser = "foo" group = "libvirt-qemu" -
配置并启动libvirt
sudo systemctl status libvirtd # 查看libvirtd是否启动 sudo systemctl start libvirtd # 如果没有启动,启动libvirtd sudo systemctl enable libvirtd # 设置libvirtd开机启动 -
VM image默认保存在
/var/lib/libvirt/images, 下载一个镜像保存到/var/lib/libvirt/isos目录下,mkdir /var/lib/libvirt/isos cd /var/lib/libvirt/isos wget https://releases.ubuntu.com/focal/ubuntu-20.04.6-live-server-amd64.iso -
使用
virt-install创建并运行一个虚拟机virt-install \ --name firstVM \ --ram 2048 \ --disk path=/var/lib/libvirt/images/try.qcow2,size=8 \ --vcpus 2 \ --os-type linux \ --os-variant generic \ --cdrom /var/lib/libvirt/isos/ubuntu-20.04.6-live-server-amd64.iso -
virsh list --all查看所有虚拟机- start, reboot, and shutdown VM -
virsh start <VM>,virsh reboot <VM>, andvirsh shutdown <VM> - clone VM and create storage image -
virt-clone -o <VM> -n <new_VM> -f /var/lib/libvirt/images/<new_VM>.qcow2
- start, reboot, and shutdown VM -
后续如果有时间,会对kvm, libvirt, openstack, container做更加详细的介绍。
Appendix
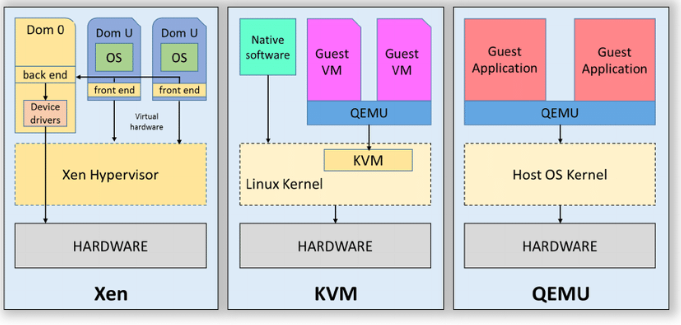
Comparison of Xen, KVM, and QEMU.
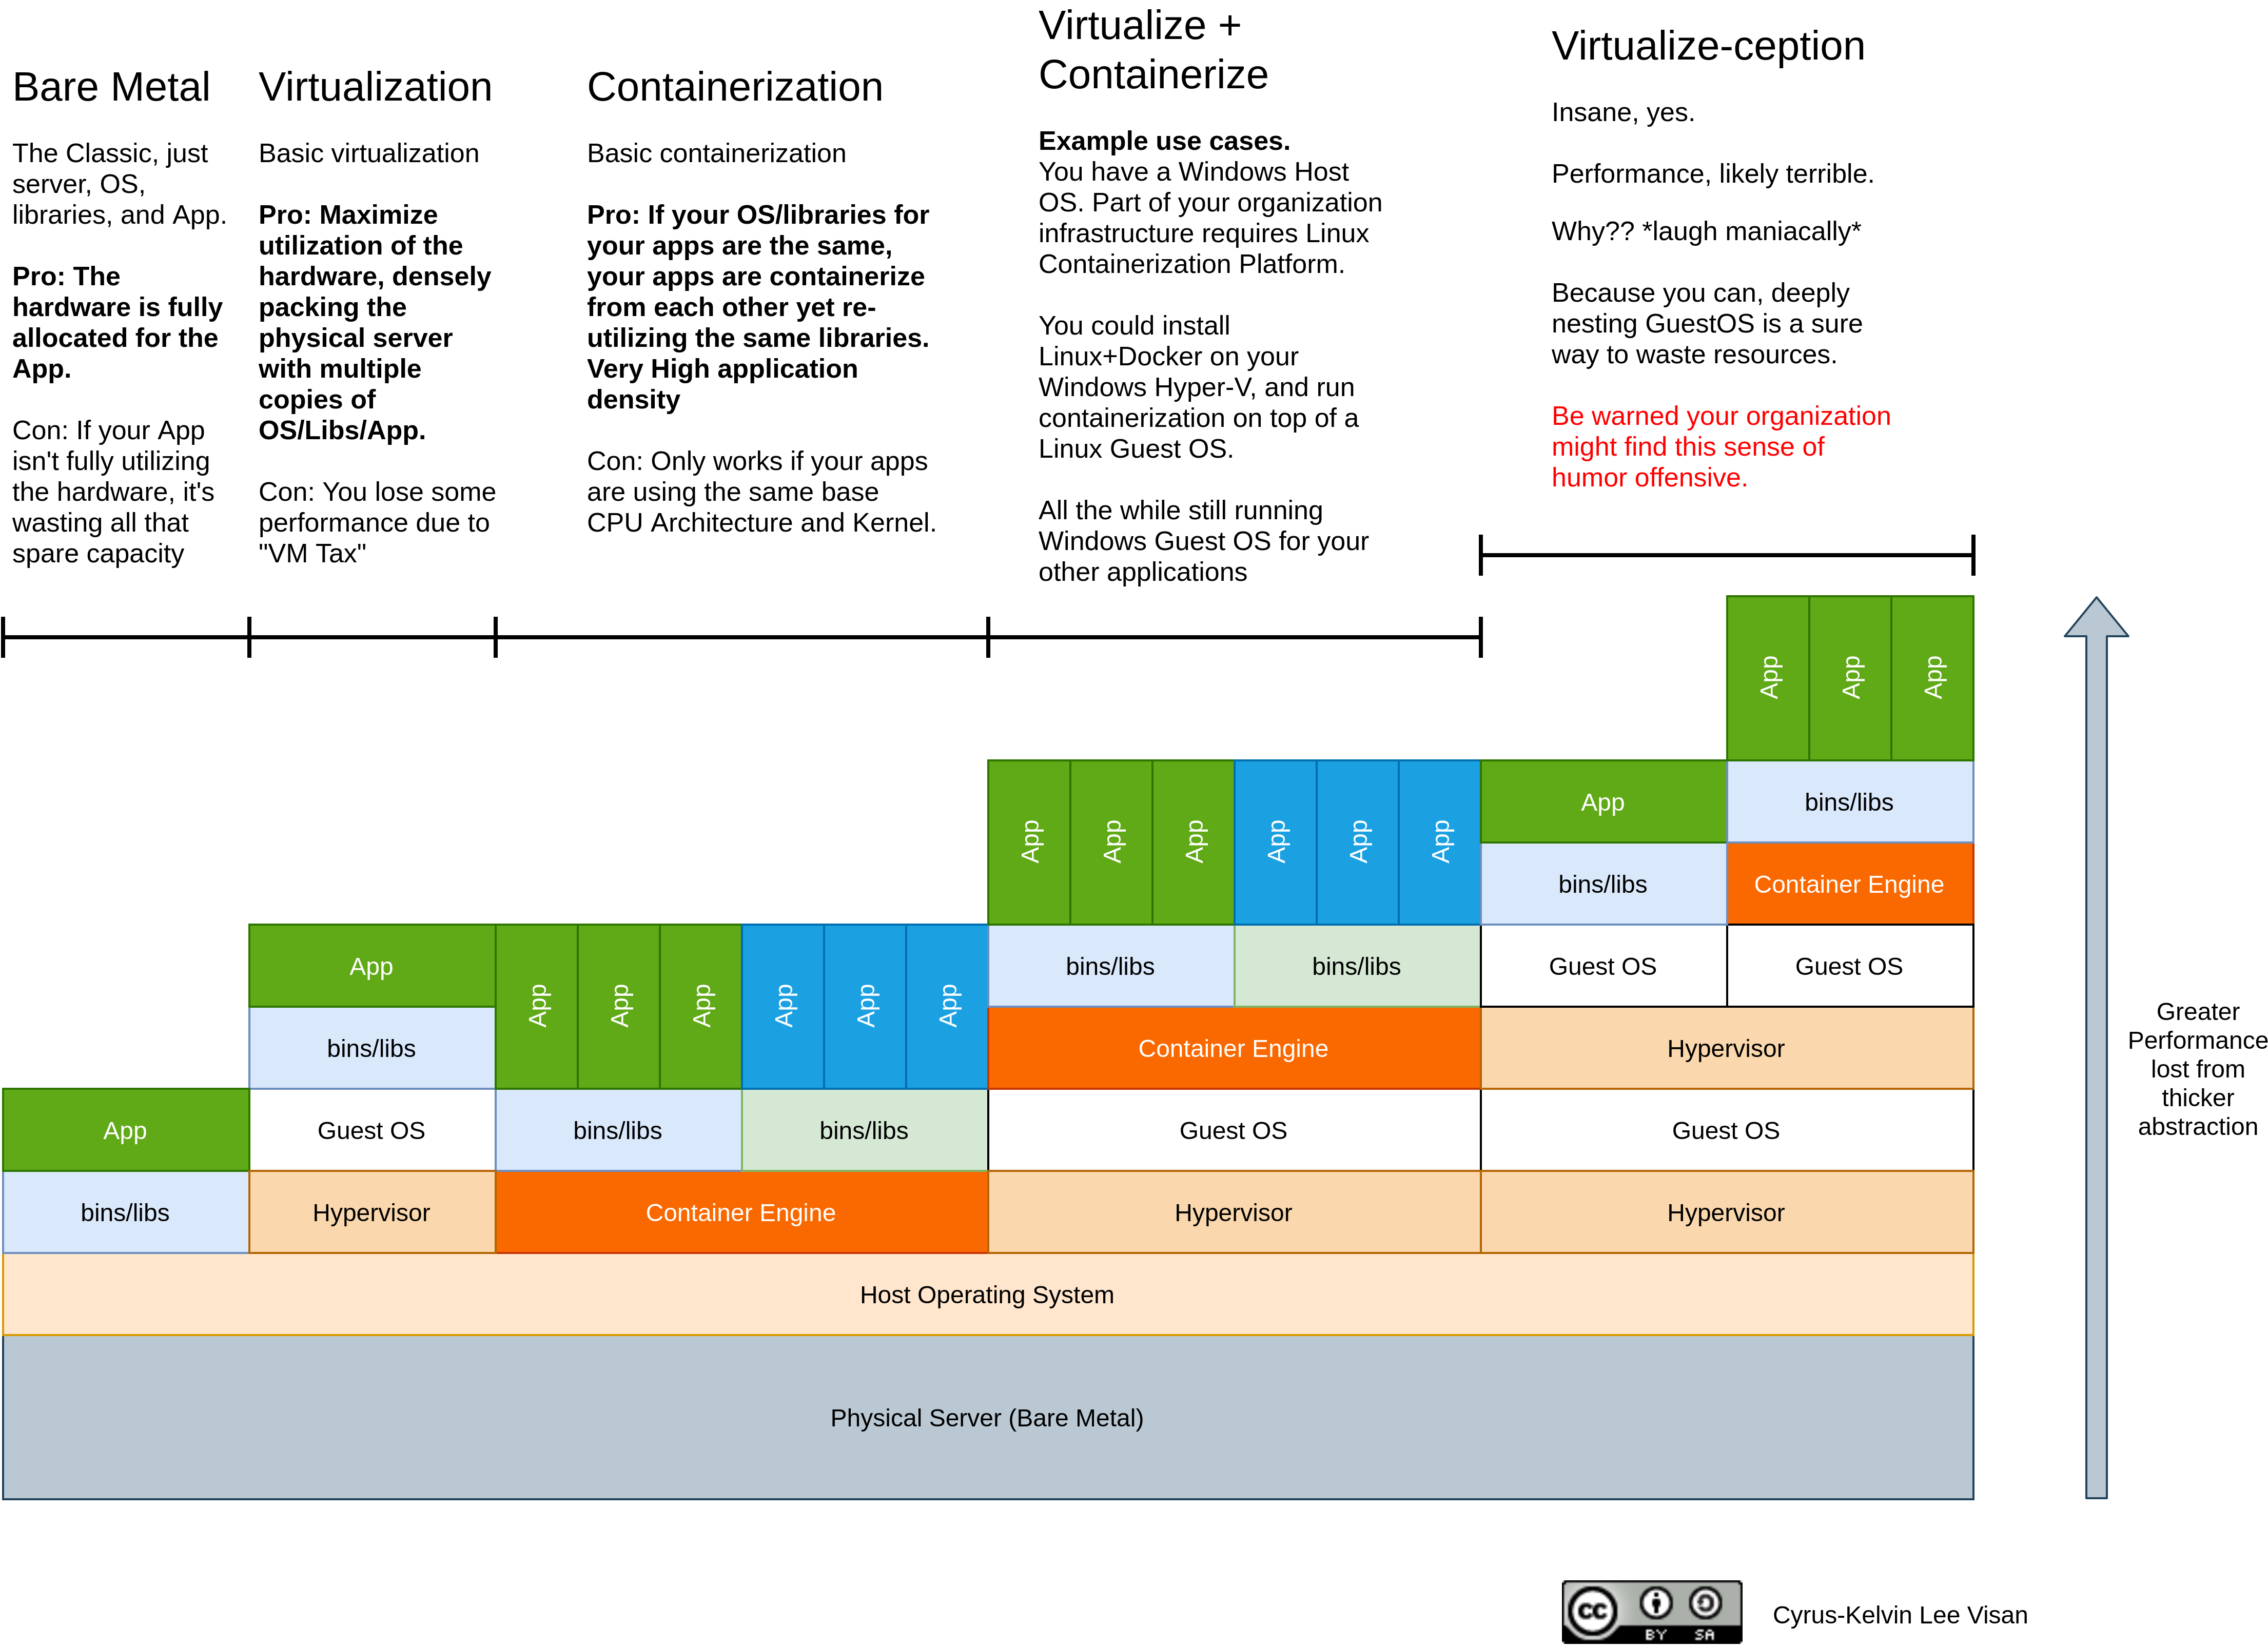
Comparison of virtualization and containerization.
Reference
-
The Ideal Versus the Real: Revisiting the History of Virtual Machines and Containers
- Libvirt - The Unsung Hero of Cloud Computing
- Libvirt for KVM/QEMU
- The libvirt & virtualization tools software development platform
- The life of an OpenStack libvirt image
- Virtualization using KVM + QEMU + libvirt
Videos
Enjoy Reading This Article?
Here are some more articles you might like to read next: